1.下载
ElasticSearch官方下载地址www.elastic.co/cn/downloads/past-releases#elasticsearch
最好选择版本7.x,因为8.x的有些应用还不支持,选7.x比较稳妥
2.安装
安装方法www.elastic.co/guide/en/elasticsearch/reference/7.17/rpm.html
2.1 yum安装(推荐)
elasticsearch.repo
[elasticsearch]
name=Elasticsearch repository for 7.x packages
baseurl=https://artifacts.elastic.co/packages/7.x/yum
gpgcheck=1
gpgkey=https://artifacts.elastic.co/GPG-KEY-elasticsearch
enabled=0
autorefresh=1
type=rpm-md
安装
yum install --enablerepo=elasticsearch elasticsearch2.2 tar解压安装
下载后直接解压即可
3.配置
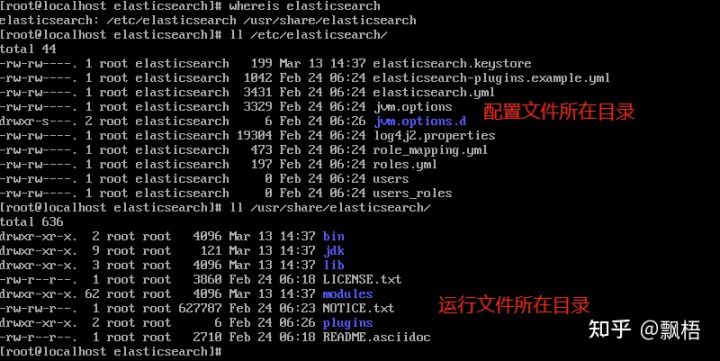
查看elasticsearch位置

编辑修改elasticsearch.yml
// 集群名称
cluster.name: es_cluster
// 节点名称
node.name: es_node01
// 数据存储位置
path.data: /var/lib/elasticsearch
// 日志存储位置
path.logs: /var/log/elasticsearch
// 服务地址,0.0.0.0运行所有IP访问
network.host: 0.0.0.0
// 服务端口,注意开启防火墙端口
// sudo firewall-cmd --zone=public --add-port=9200/tcp --permanent
// sudo firewall-cmd --reload
http.port: 9200
// 开启跨域,elasticsearch_head要访问,必须开启
http.cors.enabled: true
// 允许跨域内容,elasticsearch_head要访问,必须开启
http.cors.allow-origin: \"*\"
// 集群初始化主节点
cluster.initial_master_nodes: [\"es_node01\"]
4.运行
配置完成后就可以运行了,这里分为两种情况
4.1 yum安装
如果是通过yum安装的,可以直接通过systemctl启停用服务
// 查看服务状态
systemctl status elasticsearch
// 启动服务
systemctl start elasticsearch
// 停止服务
systemctl stop elasticsearch
// 重启服务
systemctl restart elasticsearch
4.2 tar解压安装
如果是通过tar解压安装,比较麻烦一些,步骤如下:
4.2.1 新建elsearch用户和用户组
// 新建elsearch用户组
groupadd elsearch
// 新建用户elsearch,并设置密码为elsearch
useradd elsearch -g elsearch -p elasticsearch
4.2.2 将elasticsearch解压包路径指定为elsearch用户和用户组
// 修改elasticsearch路径的用户组和用户为elsearch
chown -R elsearch:elsearch /home/elasticsearch-7.17.1/
4.2.3 调整内存映射大小
临时性:
sysctl -w vm.max_map_count=262144永久性:
// 编辑/etc/sysctl.conf(vi /etc/sysctl.conf)
vm.max_map_count=262144
不调整的话会出现以下错误:
max virtual memory areas vm.max_map_count [65530] is too low, increase to at least [262144]4.2.4 调整进程数大小
// 编辑/etc/security/limits.conf(vi /etc/security/limits.conf)
elsearch soft nofile 65536
elsearch hard nofile 131072
elsearch soft nproc 2048
elsearch hard nproc 4096
说明:
- elsearch:表示用户elsearch
- soft:表示软限制,代表警告设定,可以超过这个设定值,但是超过后会有警告。(通常soft比hard小)
- hard:表示硬限制,代表严格设定,不允许超过这个设定的值。
- nofile : 是每个进程可以打开的文件数的限制
- nproc : 是操作系统级别对每个用户创建的进程数的限制
不调整的话会出现以下错误:
max file descriptors [4096] for elasticsearch process is too low, increase to at least [65536]注意:如果没有生效的话,需要退出elsearch用户,重新登录一下elsearch用户
4.2.5 切换用户elsearch启动
如果还有错误,根据错误提示,自行百度。
建议能通过yum安装的通过yum安装
5.检验
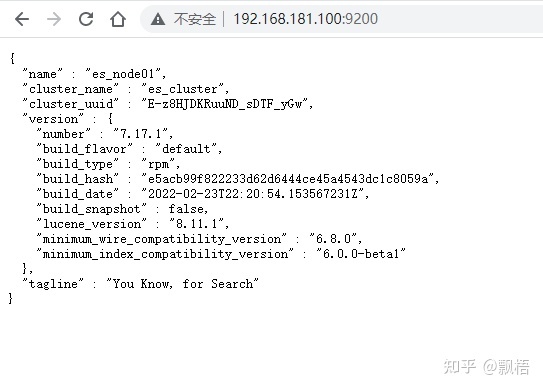
在客户端打开ip:9200访问,出现如下则成功

6.elasticsearch_head
elasticsearch_head是elasticsearch的一个web前端项目,可以用来做elasticsearch的查看索引、搜索数据等可视化的操作。
6.1 git地址
https://github.com/mobz/elasticsearch-headgithub.com/mobz/elasticsearch-head
6.2 安装
elasticsearch7.x不支持将elasticsearch_head作为插件进行安装,所以我们需要自行运行elasticsearch_head项目。
git clone git://github.com/mobz/elasticsearch-head.git
cd elasticsearch-head
npm install --registry=https://registry.npm.taobao.org
6.3 修改配置
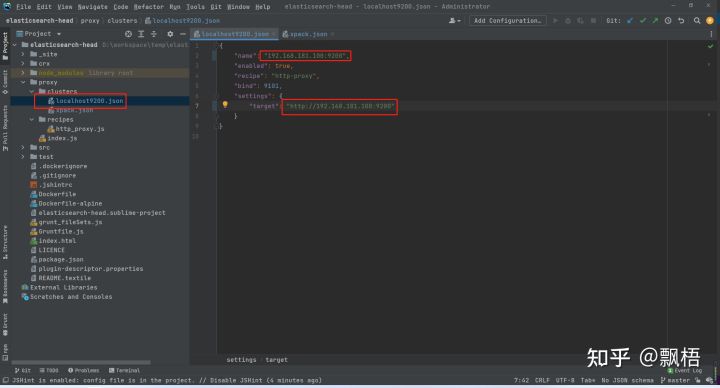
elasticsearch_head支持访问远程的elasticsearch服务,一是需要elasticsearch开启运行跨域,而是修改elasticsearch_head的配置,如下

6.4 启动项目
npm run start6.5 访问服务
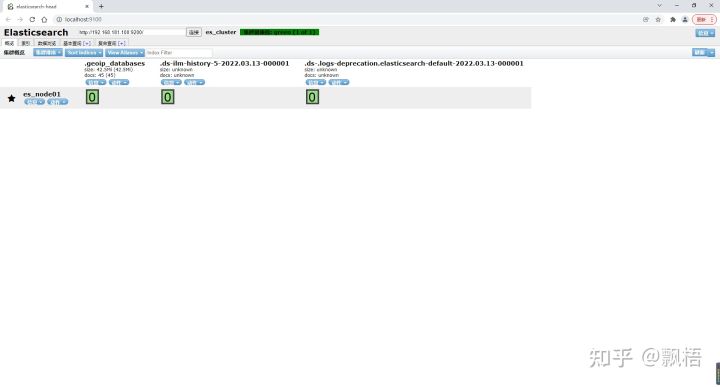
打开服务http://localhost:9100

默认是本地的elasticsearch,修改为远程的elasticsearch后

综上,elasticsearch服务就装好了
来源:https://www.cnblogs.com/guohaixin/p/16002125.html
本站部分图文来源于网络,如有侵权请联系删除。
 百木园
百木园